Here's how to install your DIE RINGE ceiling hooks including the expansion anchors with a yellow plastic ring.
Caution
Please read the warning and installation instructions carefully before installing the product. Significant dangers from injuries and/or damage to other objects can be avoided only with correct installation of the ceiling hooks. We recommend having the installation carried out by a professional. We take no responsibility for injuries and/or damage caused by incorrect installation. The included installation accessories are intended only for the mounting of the two ceiling hooks.
Consider the following points before installation:
- Inspect the product for defects and possible manufacturing errors. If you notice any defects on the product, do not start the installation and contact us by email at hello@dieringe.com.
- If necessary, ask the owner if the installation of the ceiling hooks is permitted.
- Make sure that the ceiling is made of solid concrete and is load-bearing. For installation on other materials such as wood, contact a technician and/or specialist dealer.
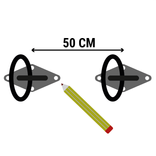
Mark drill holes
The distance between the ceiling hooks should be 50 cm. Of course, you can adjust the distance to your needs. Mark the drill holes on the ceiling. Hold the ceiling hooks at the desired positions and mark the drill holes with a pencil.
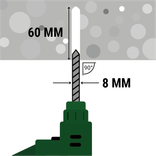
Drilling holes
Use a masonry drill bit (8 mm) and drill holes 60 mm deep at the marked spots.
After drilling, check if the holes are deep enough. Test with an assembled heavy-duty anchor to see if it can be smoothly inserted into the hole. The sleeve of the anchor should be flush with the ceiling surface.
Caution: Do not tighten the screw during the test, as the heavy-duty anchor cannot be removed afterwards. The final installation will be done in conjunction with the ceiling hooks!
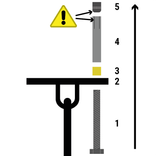
Assembling the ceiling hooks and expansion anchors
Connect the included expansion anchors (1, 3, 4, 5) with the ceiling hooks (2), as illustrated in the sketch. Make sure that the notches on the sleeve (4) are aligned with the narrow end of the nut (5). Screw the screws (1) into the nut (5) by hand until tight. Repeat the steps for all other expansion anchors.

Inserting expansion anchors into the ceiling
Insert all expansion anchors evenly into the drill holes with the connected ceiling hook. Drive the anchors into the holes with light hammer blows until the ceiling hook rests on the ceiling.
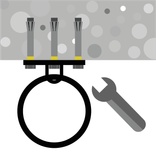
Tightening the screws
Secure the ceiling hooks by tightening the screws with a wrench or socket wrench. This will cause the anchor bolts to expand.
Ceiling Mount Set for Gym Rings
Product information
€28.99
Mount your gymnastic rings securely and flexibly with this Ceiling Hook Set made of robust 304 stainless steel. The extra-large rings ensure maximum freedom of movement, while the included mounting hardware provides a firm hold on concrete and wooden ceilings.
In stock and ready to ship
