How to install your DIE RINGE ceiling mounts
On this page you will find all the important installation instructions for installing your DIE RINGE ceiling mounts.
First find the right place for your ceiling hooks
Are you unsure how much space you should plan for your gymnastic rings? In the following video, Eric gives you a few guidelines to help you choose the right place.

Warning
Please read the warning and installation instructions carefully before installing the product. Only if the ceiling hooks are installed correctly can significant risks of injury and/or damage to other objects be avoided. We recommend having the installation carried out by a qualified person. We accept no responsibility for injuries and/or damage caused by incorrect installation. The installation accessories supplied are only intended for mounting the two ceiling hooks.
Steps before Installation:
- Check the product for possible defects or manufacturing errors. If you notice any issues or have concerns, do not proceed with the installation and contact us immediately via email.
- If you are not the owner of the building or apartment, please confirm beforehand if the installation of the ceiling hooks is allowed.
- Ensure that your ceiling or wooden beams are load-bearing and in good condition. The included installation accessories are suitable for both solid concrete and wood. If you have doubts about the load-bearing capacity or the condition of the ceiling or beams, please consult a professional or a specialized retailer.
Instructions for solid concrete ceilings
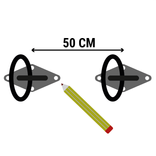
Marking the drill holes
Ideally, the distance between the ceiling mounts should be 50 cm. However, you can adjust this distance based on your needs. Mark the drill positions with a pencil.
Drilling holes
Use a 10 mm masonry drill bit and drill 70 mm deep holes at each of the marked points. Then check whether the drill holes are deep enough.
When drilling, make sure that the drill bit is at a 90-degree angle to the ceiling.
Use an assembled heavy-duty anchor to test whether it can be inserted smoothly into the hole. The sleeve of the anchor should be flush with the surface of the ceiling.
Caution: The screw must not be tightened during testing, otherwise the heavy-duty anchor cannot be removed. The final installation is carried out in conjunction with the ceiling hooks.
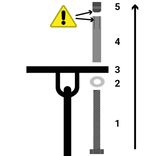
Assemble ceiling hooks and expansion anchor
Connect the enclosed expansion anchors (1, 2, 4, 5) to the ceiling hooks (3), as shown in the sketch. Ensure that the notches on the sleeve (4) are aligned with the narrow end of the nut (5). Hand-tighten the screws (1) into the nut (5). Repeat the steps for all other expansion anchors.

Insert expansion anchor into the ceiling
Drive the anchors into the holes with gentle hammer blows until the ceiling hooks sit flush against the ceiling.
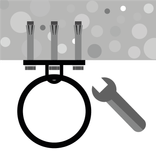
Tighten the screws
Tighten the screws of the ceiling hooks using a wrench or a ratchet with a 10 mm socket, causing the anchor bolts to expand.
Important: Please note that in this video an older model of the ceiling hooks is installed, therefore the dimensions of the drill holes and drill bits differ.

Instructions for wood
Mark the drill holes
The distance between the ceiling hooks should be 50 cm. Of course, you can also adjust the distance to suit your needs.
Mark the drill holes on the ceiling or wooden beam. To do this, hold the ceiling hooks at the desired positions and mark the drill holes with a pencil.

Drill holes
Make sure that the wood is sufficiently thick and can carry the planned load. Use a 5mm wood drill and drill 70mm deep holes at the marked points.
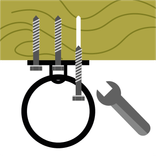
Tighten the screws
Place the ceiling hooks over the drilled holes and screw the screws firmly into the wood using a 10 mm socket wrench until the ceiling hooks are seated tightly against the ceiling.
Ceiling Mount Set for Gym Rings
Product information
€28.99
Mount your gymnastic rings securely and flexibly with this Ceiling Hook Set made of robust 304 stainless steel. The extra-large rings ensure maximum freedom of movement, while the included mounting hardware provides a firm hold on concrete and wooden ceilings.
In stock and ready to ship
